Công ty luật di trú độc lập lớn nhất tại Úc. Nhận tư vấn MIỄN PHÍ
Cần giúp đỡ? Chúng tôi làm việc 7 ngày một tuần.

Hãy cho chúng tôi biết về tình hình của bạn và luật sư di trú của chúng tôi sẽ sớm phản hồi bạn.
Hãy cho chúng tôi biết về tình hình của bạn và luật sư di trú của chúng tôi sẽ sớm phản hồi bạn.

Đề cử Giải thưởng Doanh nghiệp Tốt nhất của Telstra năm 2025
Đạt giải thưởng Công ty Luật Di trú Úc đáng tin cậy nhất năm 2023-2026
Xếp hạng 1 về luật di trú năm 2023, 2024 và 2025

Được xếp hạng trong top luật sư chuyên về di trú năm 2023, 2024, 2025 và 2026.

Xếp hạng công ty luật di trú tốt nhất năm 2024 & 2025

LƯU Ý: Quyết định đầu tiên bạn cần đưa ra là liệu bạn nên tạo tài khoản ImmiAccount hay thuê một luật sư di trú Úc để đại diện cho bạn trong quá trình nộp đơn xin thị thực. Hướng dẫn từng bước này sẽ giải thích cách đăng ký, xác minh và đăng nhập vào tài khoản ImmiAccount của bạn để bắt đầu thủ tục xin thị thực Úc.
Nếu bạn đang nộp đơn xin một loại thị thực đơn giản, dễ hiểu và có thời hạn, ví dụ như thị thực du lịch, bạn có thể tạo tài khoản Immi và tự chuẩn bị hồ sơ xin thị thực! Tuy nhiên, ngay cả những người xin thị thực du lịch sở hữu một số loại hộ chiếu nhất định vẫn bị từ chối cấp thị thực du lịch HÀNG NGÀY vì Chính phủ Úc lo ngại người nước ngoài sẽ ở lại quá hạn và không trở về nước.
Nếu bạn không chắc mình có đáp ứng các điều kiện xin thị thực hay không, chúng tôi khuyên bạn nên tìm kiếm sự tư vấn chuyên nghiệp trước khi nộp đơn để tránh rủi ro bị từ chối thị thực. Hãy liên hệ với đội ngũ của chúng tôi ngay hôm nay!
Nếu bạn đang nộp đơn xin thị thực thường trú, loại thị thực cho phép bạn trở thành cư dân thường trú tại Úc, chúng tôi khuyên bạn nên cân nhắc thuê một luật sư di trú Úc để chuẩn bị và nộp hồ sơ. Các yêu cầu đối với thị thực thường trú khắt khe hơn rất nhiều, và bạn không nên mạo hiểm bị từ chối. Chúng tôi đã từng chứng kiến nhiều trường hợp đơn xin thị thực bị từ chối chỉ vì những sai sót nhỏ nhất (ví dụ như đính kèm giấy xác nhận lý lịch tư pháp sai). Nếu đơn xin thị thực của bạn bị từ chối, bạn có thể phải chờ đến 2 năm để yêu cầu xem xét lại quyết định từ chối tại tòa án xem xét hành chính của Úc (điều này áp dụng nếu bạn có quyền kháng cáo và xem xét lại; trong hầu hết các trường hợp, những người nộp đơn ở nước ngoài không có quyền này).
Để đảm bảo đủ điều kiện xin thường trú tại Úc, các hồ sơ sẽ phải trải qua quá trình đánh giá nghiêm ngặt hơn, và việc thiếu dù chỉ một tài liệu cũng có thể dẫn đến việc bị từ chối cấp thị thực hoặc chậm trễ trong quá trình xử lý.
Vì vậy, nếu bạn đã tìm hiểu kỹ và muốn tự mình nộp đơn xin thị thực, hướng dẫn này sẽ giúp bạn thực hiện các bước tạo tài khoản ImmiAccount. Mặc dù mẫu đơn giấy vẫn còn được sử dụng, nhưng ImmiAccount cung cấp một cổng thông tin trực tuyến an toàn. Nó không chỉ giúp bạn truy cập thông tin dễ dàng hơn mà còn giúp bạn theo dõi các mốc thời gian nộp đơn, vì việc không tuân thủ thời hạn thường dẫn đến việc đơn xin thị thực bị từ chối.
Trước khi bạn bắt đầu, hãy đảm bảo bạn có quyền truy cập internet và địa chỉ email hợp lệ. Nếu bạn đang đọc điều này trực tuyến, bạn có thể có cái trước được bảo hiểm! Có một địa chỉ email là điều cần thiết để liên lạc với Bộ Nội vụ. Hãy tiếp tục đọc để tìm hiểu các bước tiếp theo khi bạn đã có những bước này.
ImmiAccount là cổng thông tin quản lý thị thực trực tuyến chính thức do Bộ Nội vụ Úc cung cấp. Năm 2013, Chính phủ Úc đã triển khai hệ thống ImmiAccount nhằm hiện đại hóa quy trình nhập cư phù hợp với thời đại số. Được thiết kế để giảm sự phụ thuộc vào hệ thống VEVO và nâng cao tính tiện lợi, ImmiAccount đã chứng tỏ là công cụ vô cùng hữu ích cho cả cá nhân và tổ chức trong quá trình nộp đơn xin thị thực.
ImmiAccount là cổng thông tin dẫn đến trang web nộp đơn xin thị thực của Bộ Nội vụ, yêu cầu tất cả người dùng phải đăng ký. Sau khi đăng ký, đây sẽ là nền tảng giúp bạn:
Ngoài ra, ImmiAccount còn tích hợp với nhiều dịch vụ khác nhau, bao gồm khai báo MyHealth, Visa Finder, Hệ thống Xác minh Quyền Lợi Thị thực Trực tuyến (VEVO) và công cụ ước tính chi phí, mang đến một nguồn thông tin toàn diện để hỗ trợ người dùng tìm hiểu các dịch vụ nhập cư.
Mặc dù các biểu mẫu trên giấy vẫn là một tùy chọn, việc tạo ImmiAccount cho phép theo dõi trạng thái ứng dụng theo thời gian thực và đảm bảo liên lạc kịp thời với Bộ qua thông báo qua email. Hơn nữa, ImmiAccount cho phép xử lý thanh toán an toàn, đảm bảo phí đăng ký được thanh toán kịp thời.
[câu chuyện thành công] [/câu chuyện thành công]
Mặc dù ImmiAccounts dành cho tất cả mọi người, nhưng có các loại tài khoản khác nhau tùy thuộc vào việc bạn là cá nhân hay tổ chức (chẳng hạn như công ty luật hoặc công ty tư vấn di trú). Các loại tài khoản này bao gồm:
Là người nộp đơn, bạn sẽ đăng ký với tư cách cá nhân. Bất kỳ thành viên gia đình nào có thể hỗ trợ đơn đăng ký của bạn hoặc nộp đơn thay mặt bạn cũng có thể đăng ký tài khoản của riêng họ.
Luật sư Di trú Úc của bạn cũng sẽ có một tài khoản như một tổ chức. Khi bạn đã chỉ định chúng tôi làm đại diện của bạn, chúng tôi sẽ có thể xem thông tin liên quan đến tình trạng và quyền lợi của bạn.
Tạo một ImmiAccount rất đơn giản và nhanh chóng. Tất cả những gì bạn cần trước khi bắt đầu là một địa chỉ email hợp lệ mà bạn hiện có quyền truy cập, cũng như các chi tiết cá nhân của bạn.
Đi tới 'Tạo ImmiAccount' qua liên kết này
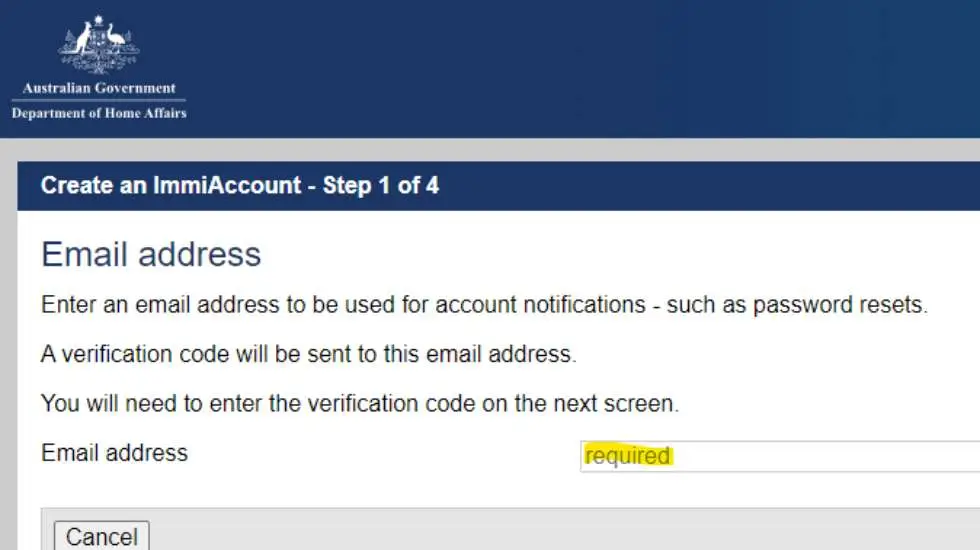
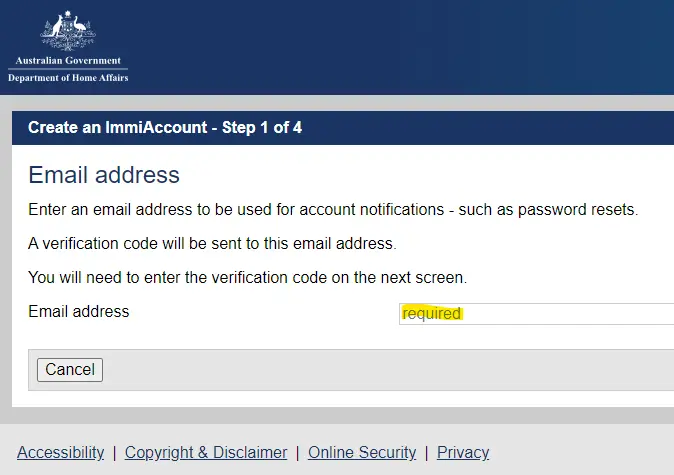
Bạn sẽ được chuyển đến trang đăng ký, nơi bạn sẽ được yêu cầu nhập địa chỉ email của mình. Sau khi nhập địa chỉ, bạn sẽ nhận được một mã xác minh, vì vậy hãy đảm bảo rằng bạn có thể truy cập vào hộp thư điện tử của mình để xác minh ngay lập tức.
Khi bạn đã nhập mã xác minh được gửi đến email của mình, bạn sẽ được yêu cầu nhập chi tiết người dùng của mình. Nếu bạn không nhận được mã, vui lòng kiểm tra thư mục spam / rác của bạn hoặc nhấp vào 'Gửi lại mã xác minh'.
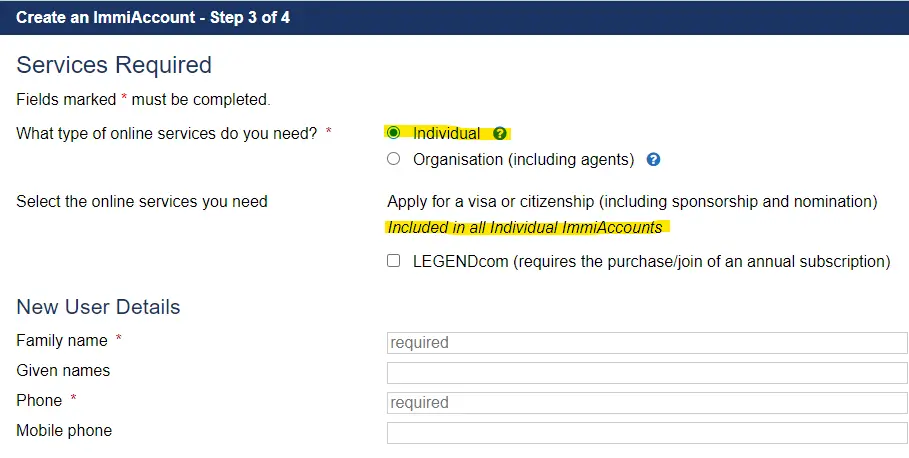
Khi chọn các dịch vụ được yêu cầu, hãy chọn 'tài khoản cá nhân'. Không cần phải chọn bất kỳ dịch vụ bổ sung nào vì đơn xin thị thực và quốc tịch được bao gồm trong tất cả các ImmiAccounts cá nhân - như được nêu bật bên dưới.
Sau đó, nhập thông tin cá nhân của bạn như chúng xuất hiện trên hộ chiếu của bạn.
Sau đó, bạn sẽ được yêu cầu hoàn thành chi tiết tài khoản của mình. Điều này đòi hỏi phải đặt mật khẩu và câu hỏi bảo mật. Đảm bảo rằng mật khẩu của bạn được bảo mật và các câu hỏi của bạn vừa dễ nhớ đối với bạn, nhưng người khác không biết. Cũng có thể hữu ích khi kích hoạt thông báo cảnh báo bảo mật, để đảm bảo rằng bạn được thông báo trong trường hợp ai đó xâm nhập trái phép vào tài khoản của bạn.
Cuối cùng, bạn được yêu cầu đọc và chấp nhận các điều khoản và điều kiện của tài khoản. Điều này cũng yêu cầu bạn chọn hộp xác nhận rằng bạn 'không phải là robot'. Khi bạn đã đọc và chấp nhận các điều khoản, chứng minh bạn không phải là robot, thì bạn có thể gửi đơn đăng ký của mình. Thao tác này sẽ tự động gửi cho bạn một email có liên kết xác nhận. Nhấp vào liên kết này để tiếp tục đến tài khoản mới tạo của bạn.
Khi đăng nhập vào tài khoản ImmiAccount, quý vị sẽ thấy danh sách tất cả các đơn xin hiện tại mà quý vị đã nộp (nếu có). Danh sách này cũng bao gồm các đơn xin của các thành viên gia đình được nộp chung trong cùng một hồ sơ. Quý vị có thể sắp xếp các đơn xin theo từng cột để hiển thị đơn xin mới nhất lên đầu và theo dõi tình trạng thị thực.
Sau khi đã chọn đơn đăng ký phù hợp, bạn có thể quản lý các khoản thanh toán liên quan. Các khoản thanh toán này được bảo mật và sẽ không phát sinh bất kỳ khoản phí nào từ bên thứ ba hay phí bổ sung. Khi đơn đăng ký của bạn đã sẵn sàng để được phê duyệt, bạn có thể nộp trực tiếp qua tài khoản ImmiAccount của mình. Bất kỳ thông tin bổ sung nào mà cơ quan chức năng yêu cầu sẽ kích hoạt thông báo đến tài khoản hoặc email của bạn. Bạn cần thường xuyên kiểm tra bảng điều khiển, vì việc bỏ lỡ yêu cầu cung cấp thông tin bổ sung có thể dẫn đến việc đơn đăng ký bị từ chối ngay lập tức.
Nếu quý vị có bất kỳ thắc mắc nào hoặc cần hỗ trợ thêm để quản lý hồ sơ visa trực tuyến, quý vị có thể tìm thấy số điện thoại của bộ phận hỗ trợ kỹ thuật và các phòng ban liên quan trên trang web.
[free_consultation]
Nếu bạn quan tâm đến việc có thêm thông tin về thị thực, hãy liên hệ với Luật sư Di trú Úc để được tư vấn.
[/free_consultation]
Tài khoản ImmiAccount của bạn đóng vai trò quan trọng trong quy trình xin thị thực Úc. Đây là cổng thông tin trung tâm cho phép bạn thực hiện các thao tác như tải lên, nộp đơn, sửa đổi và liên lạc với cơ quan chức năng. Từ khi bạn nộp đơn đến khi nhận được thông báo về kết quả, tài khoản của bạn có thể sẽ là điểm tiếp xúc đầu tiên và cũng là cuối cùng của bạn với quy trình xin thị thực Úc. Cụ thể hơn, tài khoản ImmiAccount:
[aus_wide_service] [/aus_wide_service]
Nếu bạn không thể đăng nhập vào ImmiAccount, bạn có thể khôi phục tên người dùng hoặc mật khẩu của mình thông qua cổng thông tin chính thức của Bộ Nội vụ.
Thật không may, chúng ta rất dễ quên tên người dùng hoặc mật khẩu. Mặc dù việc có một nút đặt lại nhanh chóng và dễ dàng là rất tiện lợi, nhưng việc bảo vệ an ninh cho tài khoản của bạn cũng quan trọng không kém. Do đơn xin thị thực của bạn chứa thông tin nhạy cảm, nên tài khoản không được khôi phục quá dễ dàng.
Nếu bạn quên tên người dùng của mình, bạn có thể nhấp vào liên kết này để đặt lại.
Bắt đầu bằng cách nhập địa chỉ email của bạn, điều này sẽ kích hoạt email được gửi đến hộp thư đến của bạn. Email sẽ chứa danh sách tất cả tên người dùng đã được đăng ký vào địa chỉ email của bạn. Nếu bạn không nhận được email, bạn nên kiểm tra hộp thư đến rác / spam của mình. Sau đó, email sẽ hướng dẫn bạn qua quá trình khôi phục tên người dùng của bạn.
Nếu bạn quên mật khẩu của mình, bạn có thể theo liên kết này để khôi phục mật khẩu.
Hãy bắt đầu bằng cách nhập tên người dùng của bạn; thao tác này sẽ kích hoạt việc gửi một email khôi phục đến hộp thư đến của bạn, kèm theo hướng dẫn về cách khôi phục tài khoản. Email này sẽ chứa một liên kết cho phép bạn truy cập vào tài khoản nếu bạn trả lời đúng câu hỏi bảo mật mà bạn đã thiết lập khi tạo tài khoản.
Sẽ có vấn đề phát sinh nếu bạn vô tình quên cả tên đăng nhập lẫn mật khẩu. Nếu bạn nhập sai cả hai thông tin này 5 lần, tài khoản của bạn sẽ bị khóa trong 4 giờ. Bạn nên bắt đầu bằng cách xác nhận tên đăng nhập của mình theo hướng dẫn ở trên. Khi đã chắc chắn về tên đăng nhập đã xác nhận, bạn có thể sử dụng tính năng “Quên mật khẩu” để đặt lại mật khẩu thông qua câu hỏi bảo mật.
Nếu không có phương pháp nào ở trên phù hợp với bạn, có một tùy chọn để liên hệ trực tiếp với Bộ Nội vụ bằng cách sử dụng các chi tiết liên lạc có sẵn tại đây.
Ngay cả sau khi bạn đã nộp đơn xin thị thực ban đầu, đây không phải là kết thúc của con đường cho ImmiAccount của bạn. Tài khoản của bạn sẽ được sử dụng như một cổng thông tin để đánh giá tình trạng đơn đăng ký của bạn, đọc và trả lời các yêu cầu thông tin của Bộ và tiếp tục theo dõi các điều kiện thị thực của thị thực hiện tại của bạn. Cụ thể hơn, sau khi nộp đơn, ImmiAccount cho phép bạn:
ImmiAccount cũng có thể được sử dụng để tải lên tất cả các tài liệu cần thiết. Bạn có thể thực hiện các bước sau khi tìm cách tải lên tài liệu:
Bước 1: Xác định người nhận mà bạn đang gửi tài liệu. Tất cả các ứng viên được liệt kê trong 'Đính kèm tài liệu.'
Bước 2: Chỉ định mục đích đính kèm tài liệu. Ví dụ: nếu bạn đang cung cấp bằng chứng về địa chỉ của mình, hãy chọn 'Địa chỉ - Khu dân cư, Bằng chứng của.'
Bước 3: Chọn loại tài liệu từ menu thả xuống. Ví dụ: nếu bạn đính kèm giấy phép lái xe, hãy chọn 'Giấy phép lái xe'. Bạn cũng có thể đính kèm tài liệu không có trong danh sách bằng cách chọn 'Tài liệu khác' trong mục 'Tài liệu bổ sung'.
Bước 4: Điều hướng đến 'Duyệt qua' và chọn tài liệu bạn muốn đính kèm. Bạn có thể đính kèm đồng thời nhiều tài liệu cùng loại, chẳng hạn như bảng sao kê ngân hàng từ nhiều tài khoản khác nhau. Đảm bảo nhấp vào 'Đính kèm' chỉ một lần cho một nhóm tài liệu.
Bước 5: Xác nhận tải lên bằng cách chọn 'Đính kèm'. Các tài liệu bạn đã đính kèm sẽ được hiển thị trong phần 'Đã nhận' trên cùng một trang. Dấu kiểm màu xanh lá cây cho biết tải lên thành công.
Bạn có thể được yêu cầu tải lên một ảnh hộ chiếu bổ sung vào ứng dụng của bạn. Bạn có thể làm như vậy theo các bước sau:
Bước 1: Chọn người bạn đang đính kèm ảnh hộ chiếu. Tất cả các ứng viên được hiển thị trong 'Đính kèm tài liệu'.
Bước 2: Chọn lý do bạn muốn đính kèm ảnh. Để đính kèm ảnh của bạn, hãy chọn 'Ảnh - Hộ chiếu'.
Bước 3: Chọn 'Đính kèm' để tải lên. Một cửa sổ mới sẽ mở ra. Duyệt và chọn ảnh bạn muốn đính kèm. Loại tệp phải là jpg.
Bước 4: Định vị ảnh và chọn 'Xác nhận'. Di chuyển ảnh sao cho khuôn mặt của bạn nằm trong khung hình. Chọn 'Thêm tệp đính kèm' và 'Xác nhận'. Dấu kiểm màu xanh lá cây xuất hiện bên cạnh tài liệu để hiển thị tải lên thành công.
Bước 5: Chọn 'Đính kèm' để tải lên. Ảnh bạn đính kèm sẽ hiển thị dưới tiêu đề ‘Đã nhận’ trên cùng trang đó
Lưu ý: Tránh tải lên ảnh hộ chiếu đã quét; ảnh kỹ thuật số thường được chấp nhận dễ dàng hơn.
Mặc dù việc đăng ký và điều hướng ImmiAccount của bạn có thể đơn giản, điều này không có nghĩa là các yêu cầu về thị thực và quy trình xin thị thực đầy đủ của bạn là đơn giản.
Luật sư chính của chúng tôi, Perry Q. Wood, luôn được các đồng nghiệp và khách hàng của mình xếp hạng là một trong những luật sư di trú hàng đầu của Úc.
Có rất nhiều đại lý chưa đăng ký hoạt động mà không có giấy phép của chính phủ. Khi quý vị ủy quyền cho Australian Migration Lawyers đại diện liên lạc thay mặt quý vị, hồ sơ sẽ được nộp thông qua tài khoản ImmiAccount của văn phòng luật sư chúng tôi. Điều này có nghĩa là chúng tôi sẽ đảm nhận toàn bộ việc liên lạc với Bộ Di trú và chịu trách nhiệm tải lên tất cả các tài liệu cần thiết.
Nếu quý vị quyết định thuê Australian Migration Lawyers làm đại diện pháp lý cho mình, chúng tôi có nghĩa vụ thông báo cho Bộ về việc bổ nhiệm này. Để thực hiện việc này, quý vị cần điền vào Mẫu 956(Bổ nhiệm luật sư hành nghề đã đăng ký), ký tên vào mẫu này, và chúng tôi sẽ nộp thay mặt quý vị.
Khi bạn tranh thủ các dịch vụ của Luật sư Di trú Úc, Bộ có thể:
Không. Mặc dù hầu hết các đơn xin thị thực Úc đều được nộp trực tuyến qua ImmiAccount, nhưng trong một số trường hợp nhất định, các đơn xin trên giấy vẫn được chấp nhận. Tuy nhiên, ImmiAccount là phương thức chính và được ưu tiên để quản lý các đơn xin thị thực, quốc tịch và di trú.
Quá trình xác minh diễn ra nhanh chóng. Ngay sau khi bạn nhập mã xác minh qua email và xác nhận thông tin cá nhân, tài khoản ImmiAccount của bạn sẽ được tạo và sẵn sàng để sử dụng. Sau đó, bất kỳ thông tin nào bạn cập nhật sẽ có hiệu lực trong vòng 1-3 ngày.
Đúng vậy, nhưng quý vị sẽ cần chỉ định một đại diện được ủy quyền, chẳng hạn như một đại lý di trú đã đăng ký hoặc một đại diện pháp lý, để xử lý đơn xin thị thực của quý vị. Quý vị thực hiện việc này bằng cách nộp Mẫu 956 tới Bộ Nội vụ.
Nếu tài khoản của bạn bị khóa (ví dụ: sau nhiều lần đăng nhập không thành công), hãy đợi bốn giờ trước khi thử lại. Nếu vấn đề vẫn tiếp diễn, hãy sử dụng các tùy chọn khôi phục tài khoản hoặc liên hệ với Bộ Nội vụ để được hỗ trợ.
Với 15 năm kinh nghiệm trong lĩnh vực luật pháp và hành chính công của Hoa Kỳ, tiếp theo là 5 năm hành nghề luật di trú Úc, Nick mang đến kiến thức chuyên môn pháp lý sâu rộng trên nhiều hệ thống pháp luật khác nhau cho công việc của mình với tư cách là một luật sư di trú Úc.
Nick có bằng Cử nhân Khoa học Chính trị của Đại học Bang Florida (năm 2000), bằng Tiến sĩ Luật của Trường Luật Đại học St. Thomas (năm 2004) và bằng Thạc sĩ Quản trị Công của Đại học Bang Florida (năm 2007). Ông là thành viên của Đoàn Luật sư Florida từ năm 2006 và Đoàn Luật sư Tòa Phúc thẩm Quận Columbia từ năm 2007, tạo dựng sự nghiệp luật sư quốc tế xuất sắc trước khi chuyển đến Melbourne vào năm 2021.
Sau khi hoàn thành chương trình học luật tại Úc ở Đại học La Trobe và Trường Cao đẳng Luật, ông đã được Tòa án Tối cao bang Victoria công nhận là luật sư Úc vào năm 2022. Sau đó, ông đã được cấp Số đăng ký hành nghề luật sư 5513285, nhờ đó ông hành nghề trong lĩnh vực luật di trú. Ông là thành viên của Viện Luật sư bang Victoria.
Nick cung cấp những lời khuyên chuyên môn về nhiều vấn đề liên quan đến di trú. Nhờ đã tự mình trải qua quy trình di trú, anh không chỉ sở hữu kiến thức chuyên môn mà còn thấu hiểu sâu sắc những trải nghiệm mà khách hàng phải đối mặt trong suốt quá trình này.
Nick phục vụ khách hàng trên toàn quốc, bao gồm tại Melbourne, Sydney, Brisbane, Perth và Adelaide, đồng thời cung cấp dịch vụ hỗ trợ toàn diện.
Ông đã đại diện cho khách hàng trong các vụ việc tại Tòa án Kiểm tra Hành chính (ART), mang kinh nghiệm tranh tụng tại tòa án này vào các vụ việc di trú phức tạp và có tranh chấp.
Ngoài công việc, Nick thích đọc sách, du lịch và khám phá văn hóa cà phê ở Melbourne.
THÔNG BÁO PHÁP LÝ: Các bài viết và bài đăng trên blog do Australian Migration Lawyers công bố chỉ mang tính chất cung cấp thông tin chung và không được coi là tư vấn về di trú hay tư vấn pháp lý. Việc đọc nội dung này không tạo ra mối quan hệ luật sư-khách hàng, và việc dựa vào nội dung này hoàn toàn do quý vị tự chịu rủi ro. Do luật di trú thường xuyên thay đổi, xin vui lòng tham khảo ý kiến của một luật sư Úc đã đăng ký để nhận được tư vấn chuyên nghiệp phù hợp với hoàn cảnh cụ thể của quý vị trước khi đưa ra bất kỳ quyết định nào liên quan đến di trú hoặc nộp đơn xin di trú.
Hãy cho chúng tôi biết về tình hình của bạn và chúng tôi sẽ sớm liên hệ lại với bạn.
Hãy cho chúng tôi biết về tình hình của bạn và chúng tôi sẽ sớm liên hệ lại với bạn.
Hãy cho chúng tôi biết một chút về tình huống của bạn và một trong những luật sư di trú của chúng tôi sẽ liên hệ lại với bạn sớm nhất có thể.
Đội ngũ luật sư di trú giàu kinh nghiệm của chúng tôi luôn sẵn sàng hỗ trợ bạn — an toàn tuyệt đối. Hãy hỏi về các lựa chọn Không Thị thực, Không Phí của chúng tôi và chúng tôi sẽ hướng dẫn bạn từng bước trong hành trình.
Không cần thị thực, không mất phí. Áp dụng các điều khoản và điều kiện
.webp)